Android Core
Moving Map Under Marker Like UBER: Maps SDK for Android
Here we'll implement a draggable map with a fixed marker on top. that's only change when moving the map just like UBER.
Filter by Category
Filter by Author

Here we'll implement a draggable map with a fixed marker on top. that's only change when moving the map just like UBER.

Get up and running with Kotlin in no time

Discussing Kotlin Interface delegation and the shortcoming of the implementation inheritance
The adapter design pattern is a structural design pattern that's very useful when maintaining a legacy code or adding a new features.

The Façade design pattern is a structural design pattern. It reduces coupling and improves code readability.

Will be going through the Creational Design Pattern illustrating how and where to use it.

This tutorial will explain the fundamentals of ViewModel and LiveData and how to use them by creating simple demo App that shows recent movies.

This is a brief look into MVP clean architecture discussing why it is the best architecture for android development

This tutorial will illustrate how to implement infinite scrolling in Android, where the data should be load automatically as the user scrolls down

Example that goes through making a UML class diagram from simple problem statement
Uber is a nice and features rich App, here in this tutorial we’ll implement a feature on it that is very useful. In particular, moving the map under the marker which is UBER and many other ride sharing Apps have in common. But first, why this might be a useful feature. simply because it is very intuitive as compared to marker drag and drop. As well as such a feature is kind of self-explanatory. Users intuitively could select and unselect certain location. Making your App user-friendly and that’s exactly a kind of thing that you’ll always want to have.
So without further ado lets jump right into the code. but before we go further you need to ensure that you have setup google map correctly and you are able to see google map in your Activity. and for that, you might need to check out google maps documentation.
Now let’s have a look at how our end result should look like. As you can see when you move or drag the map around, the marker is appeared to be responding, it moves while the map is moving and when you stop at a certain point the marker will instantly drop at it. All that without holding the marker drap and drop. This happens with a simple scroll through the map.
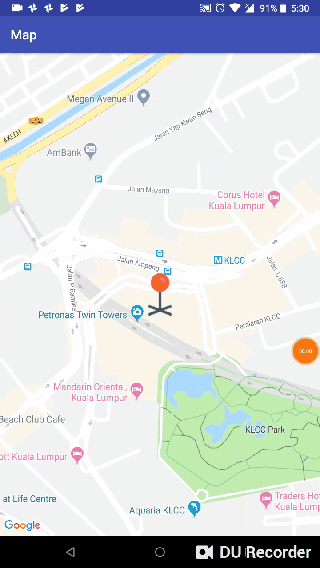
Basically, we need a RelativeLayout contains centered ImageView and Maps fragment. When we move the map around we’ll clear the map’s marker then display our ImageView marker. subsequently, when the map movement stops we’ll add a map’s marker in the position of the ImageView. Then hiding the ImageView.
Futhermore, let’s get started with xml file.
<RelativeLayout
    android:layout_width="match_parent"
    android:layout_height="match_parent"
    xmlns:android="http://schemas.android.com/apk/res/android"
    xmlns:tools="http://schemas.android.com/tools">

    <fragment xmlns:android="http://schemas.android.com/apk/res/android"
        xmlns:map="http://schemas.android.com/apk/res-auto"
        xmlns:tools="http://schemas.android.com/tools"
        android:id="@+id/map"
        android:name="com.google.android.gms.maps.SupportMapFragment"
        android:layout_width="match_parent"
        android:layout_height="match_parent"
        map:mapType="normal"
        tools:context=".MapStartedActivity"/>
    <ImageView
        android:layout_height="wrap_content"
        android:layout_width="wrap_content"
        android:layout_centerInParent="true"
        android:id="@+id/imgLocationPinUp"
        android:src="@drawable/location_pin_up"
        />
</RelativeLayout>
As you might already notice, we have RelativeLayout that contains google map fragment in addition to ImageView that positioned centered android:layout_centerInParent="true" and it has a marker shap android:src="@drawable/location_pin_up"
Second, we need to respond to the following map events in onCreate setOnCameraMoveListener() setOnCameraIdleListener() . you may then consider initializing GoogleMap like below. and don’t forget to implement GoogleMap.OnCameraMoveListener GoogleMap.OnCameraIdleListener in your MainActivity or in whatever activity or fragment that has GoogleMap fragment.
fun mapInit(googleMap: GoogleMap){
        googleMap.apply {
            // just a random location our map will point to when its launched
            val klcc = LatLng(3.1579513, 101.7116233)
            addMarker(MarkerOptions().apply {
                position(klcc)
                title("Marker pointed at klcc")
                draggable(false)
            })
            // setup zoom level
            animateCamera(CameraUpdateFactory.newLatLngZoom(klcc,18f))

            // maps events we need to respond to
            setOnCameraMoveListener(this@MapStartedActivity)
            setOnCameraIdleListener(this@MapStartedActivity)

        }
    }
Finally, we could simply implement the setOnCameraMoveListener and OnCameraIdleListener like this.
override fun onCameraMove() {
        mMap.clear()
        // display imageView
        imgPinUp?.visibility = View.VISIBLE
    }
    override fun onCameraIdle() {
        // hiding imageView
        imgPinUp?.visibility = View.GONE
        // customizing map marker with a custom icon
        // and place it on the current map camera position
        val markerOptions = MarkerOptions().position(mMap.cameraPosition.target)
                .icon(BitmapDescriptorFactory.fromResource(R.drawable.location_pin))
        mMap.addMarker(markerOptions)

    }
Featured Photo by NESA by Makers


[…] Moving Map Under Marker Like Uber (baraabytes.com) […]
Nicely done. Thank you
happy to help 🙂